
These Music Videos Create Great Percussion Ergonomics and Great Sounds
Much as a dynamic video can cause a performer's career to skyrocket, analyzing video of a musician's playing style can bolster long-term success by helping to create pain-free playing environments.
I was reminded of the multiple benefits of video analysis when I had the privilege of working with Storm Marquis, a talented percussionist from Chapman University Hall-Musco Conservatory of Music.
Not only did I get to enjoy her wonderful musical pieces, but I also earned greater appreciation of the demands of a percussionist and how subtle adjustments in her positioning and instrument placement could reduce her concerns of pain in the neck, upper back, shoulders, and forearms.
Storm was kind enough to give permission to share videos, and I'll offer some insight on observations and adjustments that were made. Gives an unparalleled opportunity to offer more accurate and individualized recommendations.
As you watch and listen, keep in mind that each style of music calls for unique body movements and instrument set up sizes. A contemporary classical drumming piece has different demands than a jazz groove.
So, sit back, enjoy some outstanding music, and let's see how great ergonomics can translate to great sounds
Drumming 1 (Contemporary Classical):
- Start with stool height/position- should adjust height so elbows are roughly at waist level and location is close enough to drum set to avoid over-reaching at upper and lower back areas. This will take pressure off the forearms and back of shoulders.
- Often, can't adjust height of percussion instrument, so must adjust height of stool or chair if available
- As Storm plays, notice how she keeps her neck and upper back in a good upright position with a relaxed and comfortable movement transition between drums. This is another sign of proper seat height and position relative to the drum set.
- She keeps a relatively looser grip that creates fluid movement without an overly tight grip that would place undue pressure on the forearms
Drumming 2 (Jazz Groove):
- Notice foot pedal position- no need to over-extend knee to reach the pedal. Allows Storm to keep a relaxed, upright position
- Wrists are kept just above lower drum level with easily controlled movement that doesn't overuse upper back, shoulders or elbows
Tympani Drums 1:
- Sitting middle to forward position of chair to allow comfortable movement of arms while still maintaining good neck and upper back alignment. Avoids too much forward lean in the neck and upper back that could cause unnecessary nerve pinching and muscle overload.
- Hand placement on drumsticks to allow the weight of the tips to initiate and maintain movement. Proper hand position and weighted drum stick selection not only enhances the quality of the sound, but also reduces cumulative burden on forearms. Drumsticks should be doing most of work, not wrists or hands.
Tympani Drums 2:
- Wonderful cross-over technique where Storm uses her entire upper body to rotate while still keeping her shoulders in good alignment with her neck and lower back. Common errors are to either cross-over only with arms or to lean too far forward with shoulders.
- Selection of a stool or chair that rotates can support the coordinated upper body rotation, with proper positioning to reduce over-reaching
Marimba 1:
- Start with music stand placement. Keeping music stand near eye-level reduces forward bending of neck and overload of front part of chest. I understand and appreciate concern that this higher stand placement may limit audience ability to see performer faces and thus is not aesthetically desired for performances. A sensible compromise might be to have higher stand placements when first learning pieces and during rehearsals. When there is more comfort with the music piece, then can consider lowering the stand.
- Wrists are just above the lower xylophone row and kept somewhat loose to allow free reach and rotation movements. Mallets are also held somewhat loose for more pain-free motion.
Marimba 2:
- Hand and wrist position is comfortable with enough grip pressure to hold mallets but not too tight to increase tension of forearms. Hand placement on shaft of mallets to allow weight of mallet tips to initiate and maintain the mallet movements.
- Body stand position to keep wrists right above lower xylophone row.
- Strong, coordinated position of upper shoulders (comes from strength work for muscles that support the scapula bone in the back of the shoulder) that allows fluid movement of lower arms and rotation at elbows and wrists.
Marimba 3:
- Follow leg movement and position- can start by watching in mirror behind Storm and then as camera moves to cover entire body position.
- Knees and hips are slightly bent to allow more comfortable stance, not held in a locked or rigid position.
- Notice this allows Storm to get more into the flow of the music- not only more enjoyable for her, but also better for joints and muscles.
Vibaphone 1:
- May or not be able to adjust vibraphone height- ideal height allows wrist placement just above instrument without need to bend at waist or head/neck.
- Storm has a good, relaxed stance with slight bend to knees and appears comfortable throughout the entire piece.
- Pedal position without need to over-extend or reach with the right knee and foot.
- Music stand placement doesn't require excessive forward bend of neck.
- Neck and upper back kept in good alignment, any reach or rotation is from a coordinated movement of the upper body without forward position of shoulders and front of chest.
Vibraphone 2:
- Neck and head movement coordinated with arm movements and creates a good overall rhythm of performer and music.
- Hand placement on mallet shaft to allow weight of mallet tips to do most of work.
- Free and fluid movement of feet, due in part to selected standing position and also to location of pedal. Rotating pedals (not fixed position) are preferred for ease of entire body movement.
I can't thank Storm enough for these awesome contributions to both her health and the health of her fellow percussionists. I sincerely appreciate what these videos have taught both of us, and am eager to share this knowledge not just with other percussionists, but with all musicians. I definitely will use video analysis in the future to provide more accurate and personalized treatment recommendations.
Now, before closing out this blog, want to share a still picture as well.
As Storm was collecting all of mallets, folders and bags, couldn't help but notice the number of items and how she was carrying them:
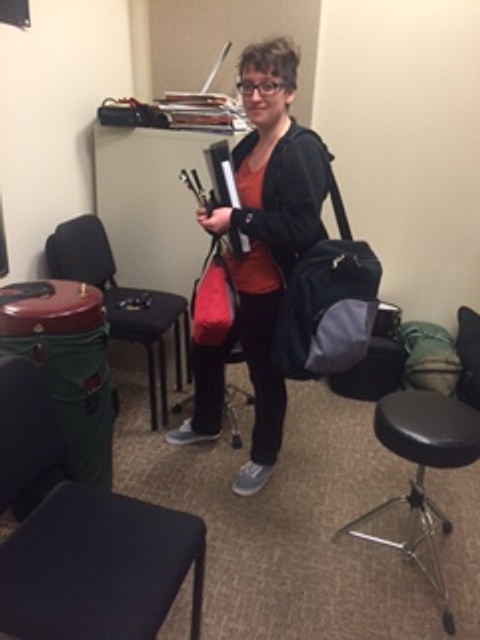
Made both of us realize that optimal body position and ergonomics aren't topics limited just to the music room. Apparently there aren't reliable and durable rolling devices that can substitute for the multiple bags. I sense a potential opportunity here!
